
Kong API Gateway #2 - Custom plugin 구현 및 배포하기
Table of Contents
2편에서는 Kubernetes 환경에 Kong을 배포하고 Custom plugin 제작 및 배포 이후 테스트하는 과정까지 다뤄볼 예정이다.
- Kubernetes 환경에 Kong 배포하기
- Custom plugin Workflow
- Sample service architecture
- Custom plugin을 만들어보자
- 외부 요청 테스트
Kubernetes 환경에 Kong 배포하기
Custom plugin을 만들기 전에 우선 Kong이 설치되어 있어야 한다. Kong을 설치하는 방법은 다양한 방법이 있는데 그 중 Kubernetes 환경에 DB-less모드로 배포하는 방법에 대해 소개하겠다.
공식문서에서 배포하는 방법에 대해 굉장히 잘 설명이 되어 있기 때문에 kubernetes환경이 준비되어 있다면 누구나 쉽게 kubernetes에 kong을 배포할 수 있다.
문서에는 각 환경별로 배포하는 방법에 대해 설명하고 있으며 테스트 환경에서는 minikube를 활용하여 쉽게 배포 및 테스트가 가능하다. (document)
Kong의 kubernetes환경 배포는 Kustomize, Helm등 도구로 배포를 진행할수 있었으며 Helm에 대한 지식이 아직 부족해 익숙한 Kustomize를 이용하여 배포를 진행하였다.
환경구성시 공식 repository에 이미 kong의 리소스 구성 형태에 따라 이미 정의해 놓은 manifest들을 찾아볼 수 있어(link) 환경 구성시 참고가 가능하며 기본적인 테스트 환경에서는 추가 구성 없이 그대로 사용이 가능하다.
이번 테스트 환경에서는 위에서 언급한것 처럼 DB-less모드로 정의되어 있는 정의를 기반으로 환경을 구성하였다.(link)
kustomize로 db-less kong-ingress-controller 배포:
$ kustomize build github.com/kong/kubernetes-ingress-controller/deploy/manifests/base | kubectl apply -f -
실제 개발 및 프로덕션 환경에서는 위 manifest를 기반으로 실제 환경에 맞추어 추가적인 환경구성을 하며 사용하면 될 것으로 보인다.
Custom plugin 구현 Workflow
앞서 1편에서 언급한것과 같이 Kong자체가 Openresty기반으로 구현되었기 때문에 Custom Plugin또한 추가적인 세팅 없이 Lua script로 구현이 가능하다.
Custom plugin을 구현하고 배포하는 전체 workflow는 다음과 같다.

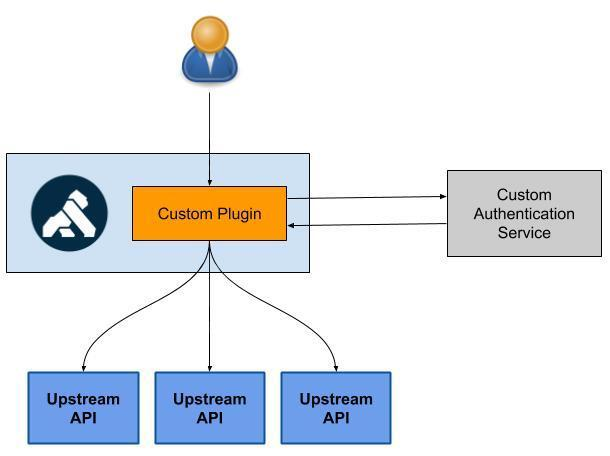
Sample service architecture
API Gateway 도입을 처음으로 검토하게된 계기가 인증관련 모듈을 비즈니스로직 서비스에서 분리해 내기 위함이었고 이미 공식문서에 굉장히 좋은 예제가 있어 구현 부분에서는 많은부분 참고하였다.
아래 그림과 같이 이번에 간단히 만들어볼 Custom plugin은 Upstream API(비즈니스로직 서버)로 가기 이전 단계에서 자체 인증 로직을 구현한 외부 서비스를 통하여 인증을 먼저 수행하도록 routing하는 용도이다.
간단히 Custom plugin의 workflow을 나열하면 다음과 같다.
- Client request에서 인증에 필요한 정보를 추출하여 외부 인증 서비스로 인증 요청을 한다.
- 인증 서비스에서 성공응답을 보낸경우 이후 Upstream API에 요청하는 과정이 수행되도록 한다.
- 인증 서비스에서 실패응답을 보낸 경우 이후 Upstream API로의 요청이 가지 않도록 Kong API에서 실패응답을 client에게 보낸다.
*참고문서: https://konghq.com/blog/custom-authentication-and-authorization-framework-with-kong/
Custom plugin을 만들어보자
Step 0. 준비단계
준비단계에서는 이후 검증을 위하여 간단한 ‘Upstream API 서비스’와 ‘Custom 인증 서비스’를 배포해본다. 실제 환경에서는 서비스가 사전에 구현되어 있을 것이므로 이 step은 건너뛰어도 좋다.
Upstream API(비즈니스로직 서비스) 배포
Custom plugin에 의해 응답 성공/실패 처리가 수행 되는지 검증기 위해 간단한 서비스를 배포해보겠다.
upstream_api.yaml 생성:
요청에 대한 정보를 그대로 응답으로 보내주는 docker hub 공식 이미지인 ealen/echo-server를 이용하여 구성해 보았다.
apiVersion: v1
kind: Service
metadata:
  labels:
    app: echo
  name: service-echo
spec:
  ports:
  - port: 8080
    protocol: TCP
    targetPort: 80
  selector:
    app: echo
---
apiVersion: apps/v1
kind: Deployment
metadata:
  labels:
    app: echo
  name: echo
spec:
  replicas: 1
  selector:
    matchLabels:
      app: echo
  template:
    metadata:
      labels:
        app: echo
    spec:
      containers:
      - image: ealen/echo-server
        name: echo-server
Upstream API 배포:
$ kubectl apply -f upstream_api.yaml
Custom 인증 서비스 구현 및 배포
Full code: phaesoo/testapi
아래는 flask로 구현한 간단한 외부 인증 서비스 구현의 서비스 부분 코드이며 아주 간단하게 token과 요청된 urlpath의 vaildation을 통해 성공 혹은 실패를 응답한다.
해당 서비스의 docker image는 이미 docker hub에 배포되어 kubernetes에서 docker image name으로 pull해 올수 있도록 준비되어 있다. Kubernetes 리소스 정의는 이곳(manifest)을 참고하면 된다.
인증 로직을 간단히 설명하면 다음과 같다.
- /apikey-simple/public으로의 요청은 인증 토큰 없이 성공응답
- /apikey-simple/private으로의 요청은 인증토큰이 유효하고, 요청된 url path가 유효한 경우 성공응답 이외 401 응답
Custom 인증 로직 구현:
# In-memory mock databases for users and whitelisted url paths
_users = {
    "token-1": "user-1",
}
_private_paths = ["/private"]
_public_paths = ["/public"]

@ns.route("/verify")
class Verify(Resource):
    def post(self, **kwargs):
        try:
            parsed = parser.parse_args()
        except Exception:
            return resp.error("Invalid request arguments")

        # OK if requested url path is in public path
        if parsed.path in _public_paths:
            return resp.ok(
                {"userUuid": "None"},
                msg="Verified",
            )

        raw_token = request.headers.get("Authorization")
        if raw_token is None:
            return resp.unauthorized()

        if "Bearer " != raw_token[:7]:
            return resp.unauthorized("Token should have to start with 'Bearer '")

        token = raw_token[7:]

        # Check whether requested token is valid or not
        user_uuid = _users.get(token)
        if user_uuid is None:
            return resp.unauthorized("Unknown user")

        # Check whether requested url path is in private path
        if parsed.path not in _private_paths:
            return resp.unauthorized("User has no permission on the path")

        return resp.ok(
            {"userUuid": user_uuid},
            msg="Verified",
        )
Custom 인증 서비스 배포:
project의 root에서 서비스 배포를 위해 다음 명령을 실행한다.
$ kustomize build k8s | kubectl apply -f -
Step 1. Custom plugin 구현
자 이제 custom plugin을 실제로 구현해보자.
기본적인 Plugin 작성을 위해서는 다음과 같은 2가지 lua script가 필수적으로 필요하다.
custom-plugin
├── handler.lua
└── schema.lua
- handler.lua: plugin의 logic을 구현하는 파트. init_worker, access등의 function name처럼 정해진 이름으로 function을 정의할 경우 정의된 시점에 kong에 의해 수행되게 됨.
- schema.lua: plugin의 configuration을 정의. 또한 request의 entity(header, fields)에 대한 validation도 가능함.
Plugin인은 위처럼 간단히 2가지 lua script만 있어도 생성할 수 있지만 실제 제작 및 배포시에는 조금 더 많은 기능들이 필요하다. 예를들면 metadata정의, 테스팅이 있다.
Kong은 고맙게도 kong-plugin이라는 github project template 를 제공하여 개발자가 좀 더 비즈니스 로직 구현에만 집중할 수 있도록 도움을 준다.
해당 template을 기반으로 custom plugin을 제작하게 되면 kong-pongo를 통해 유닛테스트, 통합테스트가 가능하고 rockspec을 통해 Kong plugin배포도 도움을 받을 수 있다.
위 template을 기반으로 예제를 위한 custom plugin을 작성하였으며 모든 코드는 다음 링크에서 확인할 수 있다. (phaesoo/kong-plugin-custom-auth)
schema.lua 정의 (Full code):
schema에서는 간단하게 3가지 필수 필드(auth_host, auth_port, auth_urlpath)를 정의하였으며 1개의 필수 header(Authorization)를 정의하였다. 위 3가지 필드는 이후 KongPlugin 오브젝트 정의(yaml)의 config에 정의될 예정이다.
local typedefs = require "kong.db.schema.typedefs"

-- Grab pluginname from module name
local plugin_name = ({...})[1]:match("^kong%.plugins%.([^%.]+)")

local schema = {
  name = plugin_name,
  fields = {
    -- the 'fields' array is the top-level entry with fields defined by Kong
    { protocols = typedefs.protocols_http },
    { config = {
        -- The 'config' record is the custom part of the plugin schema
        type = "record",
        fields = {
          {
            auth_host = {
              type = "string",
              required = true,
            },
          },
          {
            auth_port = {
              type = "integer",
              required = true,
            },
          },
          {
            auth_urlpath = {
              type = "string",
              required = true,
            },
          },
          {
            token_header = typedefs.header_name {
              default = "Authorization",
              required = true
            },
          }
        },
        entity_checks = {
        },
      },
    },
  },
}

return schema
handler.lua 정의 (Full code):
handler에서는 TokenHandler라는 객체를 생성하였고 access function을 정의하였다. 간단하게 resty.http 모듈을 사용하여 외부 인증 서비스에 인증요청을 하는 로직을 구현하였다.
PRIORITY에 지정된 값의 순서에 따라 kong plugin간 호출 순위가 결정된다. 또한 schema.lua에서 정의된 필드들이 이곳에서 사용되는 것을 확인할 수 있다.
local http = require "resty.http"
local json = require "cjson"

local TokenHandler = {
  PRIORITY = 1000,
  VERSION = "0.1",
}

function TokenHandler:access(conf)
  kong.log.inspect(conf)

  local jwt_token = kong.request.get_header(conf.token_header)
  if not jwt_token then
    kong.log.debug("Token not found in header")
    kong.response.exit(401)
  end

  local token_type = jwt_token:sub(0,7)
  if token_type ~= "Bearer " then
    kong.log.debug("Invalid token type: ", token_type)
    kong.response.exit(401)
  end

  kong.log.debug(conf.auth_host, conf.auth_port)

  local httpc = http.new()
  httpc:connect(conf.auth_host, conf.auth_port)

  local res, err = httpc:request({
    method = "POST",
    path = conf.auth_urlpath,
    headers = {
      ["Content-Type"] = "application/json",
      [conf.token_header] = jwt_token
    },
    body = json.encode({
      path = kong.request.get_path(),
      raw_query = kong.request.get_raw_query(),
    }),
  })

  if not res then
    kong.log.err("Failed to call auth_endpoint:", err)
    return kong.response.exit(500)
  end

  if res.status ~= 200 then
    kong.log.debug("Authentication failed", res.status)
    return kong.response.exit(401) -- unauthorized
  end
end

return TokenHandler
Tips
번외로 작성된 Custom plugin은 kong-pongo를 통해 쉽게 테스트를 작성할 수 있으며 test code는 project하위의 spec에 모아놓는것이 일반적이다.
pongo run spec/{target_dir}
Step 2. Configmap or Secret 생성
Custom plugin은 Kong을 운영하는 모드에 따라 그 방법이 상이한데. DB-less모드로 운영하는 경우 configmap이나 secret의 형태로 선언적으로 정의되고 관리될 수 있다.
confimap (or secret) 생성:
namespace는 kong, plugin name, directory구조는 위에서 언급한 phaesoo/kong-plugin-custom-auth를 따른다고 가정한다. project의 root directory 에서 명령을 수행하였다. 실제 환경에서는 둘중 한가지만 수행하면 되며 둘의 차이점은 리소스의 암호화 여부이다. 내부에 유출되면 안되는 비즈니스 로직이나 configuration을 담고 있으면 secret으로 리소스를 생성하면 될 것으로 보인다.
# create configmap
$ kubectl -n kong create configmap kong-plugin-custom-auth --from-file=kong/plugins/custom-auth
# or create secret
$ kubectl -n kong create secret generic kong-plugin-custom-auth --from-file=kong/plugins/custom-auth
Step 3. Patch Kong ingress controller manifest
위에서 생서된 configmap(or secret) 리소스를 kong의 deployment에 실제 반영하기 위하여 configmap(or secret)의 volume을 mount해야 하는데 기존 kong-ingress-controller의 deployment 정의에 반영하는 전략은 여러가지 방법이 있을수 있다. 그 중 이번에는 간단하게 기존 배포에 업데이트 사항을 patch하는 방향으로 진행해 보겠다. (kustomize의 patchesStrategicMerge)
작업하는 directory 구조는 다음과 같다.
manifest
├── patch_deployment.yaml
└── kustomization.yaml
patch_deployment.yaml:
apiVersion: apps/v1
kind: Deployment
metadata:
  name: ingress-kong
  namespace: kong
spec:
  template:
    spec:
      containers:
      - name: proxy
        env:
        - name: KONG_PLUGINS
          value: bundled,custom-auth
        - name: KONG_LUA_PACKAGE_PATH
          value: "/opt/?.lua;;"
        - name: KONG_LOG_LEVEL
          value: debug
        volumeMounts:
        - name: kong-plugin-custom-auth
          mountPath: /opt/kong/plugins/custom-auth
      volumes:
      - name: kong-plugin-custom-auth
        configMap:
          name: kong-plugin-custom-auth
kustomization.yaml:
resources:
- https://github.com/kong/kubernetes-ingress-controller/deploy/manifests/base
patchesStrategicMerge:
- custom-plugin.yaml
Patch 적용 및 확인:
# patch 적용
$ kustomize build manifest | kubectl apply -f -
# patch 결과 상세 확인
$ kubectl -n kong describe deployments.app ingress-kong
Step 4. Upstream API의 Ingress정의
custom-plugin을 kong에 추가만 했다고 해서 모든 Ingress에 적용되는 것은 아니다. 실제 custom plugin의 사용 여부는 Ingress별로 정의되게 되며 이는 각각의 서비스들이 어떤 plugin을 사용할지를 결정할 수 있다는 것을 의미하며 합리적이라고 생각된다.
‘0. 준비단계’ 에서 배포한 Upstream API에 대하여 Ingress를 정의하여 cluster외부에서 오는 요청에 대하여 routing규칙을 생성해 보도록 하겠다. 물론 custom-plugin을 ingress정의에 포함시켜 요청단계에서 인증을 수행하도록 한다.
ingress_echo.yaml:
apiVersion: configuration.konghq.com/v1
kind: KongPlugin
metadata:
  name: custom-auth
config:
  auth_host: "testapi.default"  # default namespace의 testapi serveice
  auth_port: 8080
  auth_urlpath: "/apikey-simple/verify"
plugin: custom-auth
---
apiVersion: networking.k8s.io/v1
kind: Ingress
metadata:
  name: ingress-echo
  annotations:
    kubernetes.io/ingress.class: kong  # ingress controller로 kong을 지정한다.
    konghq.com/plugins: custom-auth  # plugin이 추가될 경우 comma seperate로 구분하여 추가한다.
spec:
  rules:
  - http:
      paths:
      - path: /
        pathType: Prefix
        backend:
          service:
            name: service-echo
            port:
              number: 8080
외부 요청 테스트
자 이제 모든 리소스에 대한 배포가 완료되었고 마지막으로 검증하는 단계가 남았다.
외부에서 Kong proxy를 통해 요청을 보내는 테스트를 수행해 봄으로서 정상적으로 custom plugin을 통한 인증이 수행되는지 확인할 수 있다.
테스트 환경에서 minikube 기반으로 테스트 하는 경우 먼저 minikube tunnel을 통해 cluster의 ip를 host로 노출시켜 주어야 한다.
(optional) minikube tunnel:
tmux등의 화면 분할 도구로 수행하여 테스트 종료시 까지 process를 유지시킨다.
$ minikube tunnel
kong-proxy의 EXTERNAL-IP 확인 및 환경변수 설정:
$ kubectl -n kong get svc kong-proxy
NAME                      TYPE           CLUSTER-IP      EXTERNAL-IP     PORT(S)                      AGE
kong-proxy                LoadBalancer   10.105.58.220   10.105.58.220   80:30229/TCP,443:31688/TCP   22d

$ export PROXY_IP=10.105.58.220
시나리오 테스트:
간략히 다음 네가지 시나리오에 대하여 진행하여 custom plugin이 정상적으로 동작 하는지 확인할 수 있다.
# case 1) 인증 토큰 없이 public endpoint 요청 → 인증성공 후 echo서버 응답 수신
$ curl ${PROXY_IP}/apikey-simple/public
# 성공응답

# case 2) valid 토큰 으로 private endpoint요청 → 인증성공 후 echo서버 응답 수신
$ curl ${PROXY_IP}/apikey-simple/private \
-H "Authorization: Bearer token-1"

# case 3) invalid 토큰 으로 private endpoint요청 → 인증실패로 401응답
$ curl ${PROXY_IP}/apikey-simple/private \
-H "Authorization: Bearer token-2"

# case 4) valid 토큰 으로 invalid endpoint요청 → 인증실패로 401응답
$ curl ${PROXY_IP}/apikey-simple/dummy \
-H "Authorization: Bearer token-1"
Troubleshooting:
간혹 응답이 다음과 같이 올 경우 ingress-controller의 log를 확인하여 원인을 파악할 수 있다. 주로 config 관련 문제인 경우가 많았다.
$ curl ${PROXY_IP}/apikey-simple/public
{“message”:“no Route matched with those values”}

$ k -n kong logs ${ingress-kong의 pod name} ingress-controller
Comments